Mod, camcorder recorded video (modul) file (.mod)
Содержание:
- 3.2 Controlling Time
- 3.7 Player Overview
- Описание расширения MOD
- 1.1 Installing the Replay Mod
- 1.2 Installing FFmpeg
- 3.1 Movement
- 4.1 Authentication
- 3.4 Custom Objects
- Development
- 3.4 Custom Objects
- Replay Center
- Building
- 1.2 Installing FFmpeg
- 3.1 Movement
- Frequently Asked Questions
- 4.2 Replay Files
- 1.3 Compatibility with other Mods
- 3.7 Player Overview
- Frequently Asked Questions
- 1.3 Compatibility with other Mods
- 3.2 Controlling Time
3.2 Controlling Time
3.2.1 Replay Speed
In the upper left corner of you screen, there is a Play/Pause button (Shortcut: ), using which you can entirely pause the time of the Replay.All Entities, Particles and Block Updates will be frozen until you resume. You can fly through a paused Replay as usual.
Next to the Play/Pause Button, there is a Speed Slider. Using the Speed Slider, you can control how fast the time in your Replay passes.The minimum Speed value is 0.1 times the normal Minecraft Tick Speed, and the maximum Speed is 8 times as fast.

The Play/Pause button, Speed Slider and Replay Timeline hightlighted
3.2.2 Jumping in Time
To the right of the Speed Slider, there is the Replay Timeline.
On the Replay Timeline, you see a yellow cursor indicating your current position in the Replay.By clicking somewhere on this Timeline, you will travel in time towards the specified point in time.Please note that it takes longer to do larger steps in time or to jump backwards in time.
3.7 Player Overview
Using the key, you can open the Player Overview. In the Player Overview, you see a list of all currently loaded Players in the Replay.
By clicking on a player’s Name or Head, you can spectate this player.
Next to each player, there’s a checkbox using which you can toggle the player’s visibility.
This way, you can hide certain players from the Replay.Below the individual checkboxes, there are two checkbox buttons — one to hide all players and one to show all players.
If you want to save the player visibility settings, check «Remember Hidden Players» checkbox.
If checked, invisible players will stay invisible after closing the Replay (this can of course be reverted),
otherwise all of the players are visible again after reloading the Replay.
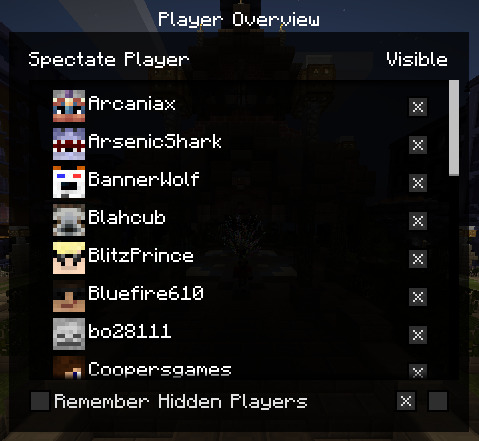
The Player Overview Screen
Описание расширения MOD
Популярность:
Раздел: Аудио файлы
Расширение MOD использовалось и, возможно, до сих пор используется некоторыми программами для звуковых модулей. Эти звуковые файлы можно было в прошлом найти на платформе Амига, а также MS-DOS. Обычно встречаются в старых компьютерных играх.
MOD файлы часто называют трэками или модулями композиций, просто потому, что первый модуль был создан в программе Soundtracker, созданной Карстен Обарский в 1987 году. Soundtracker был клонирован много раз, такими программами, как NoiseTracker и Protracker, являющимися непосредственными потомками от оригинального кода Soundtracker, а другие, такие как MED/OctaMED и Oktalyzer были написаны с нуля. Такие программы называются трекерами в целом.
Файл .MOD содержит запись звучания инструментов, их еще называют семпл. Композитор делает запись в трекере, в которой указывает, какой именно инструмент, в какое время, какой нотой и какой из октав должен прозвучать. Последовательность нот записывается в трек, а несколько параллельно звучащих треков образуют блок, который называется паттерном. Создаваемые музыкантом паттерны получают номера, после чего автор может в свободной форме указывать какой паттерн и когда должен прозвучать. Совокупность паттернов и образует модуль — файл с расширением MOD.
Одно расширение .MOD может содержать много разных звуковых форматов с тем же расширением файла.
MIME тип: audio/mod, audio/x-mod
1.1 Installing the Replay Mod
The ReplayMod requires Minecraft Forge to be installed.
Depending on your Replay Mod version we recommend the following Forge versions:
- Replay Mod 2.0.0 or later for Minecraft 1.11: Forge 1.11-13.19.1.2189
- Replay Mod 2.0.0 or later for Minecraft 1.10.2: Forge 1.10.2-12.18.2.2099
- Replay Mod 2.0.0 or later for Minecraft 1.9.4: Forge 1.9.4-12.17.0.1976
- Replay Mod 2.0.0 or later for Minecraft 1.8: Forge 1.8-11.14.4.1563
- Replay Mod 1.0.8 or older for Minecraft 1.8: Forge 1.8-11.14.3.1450
Other Forge Versions might, but don’t necessarily work.
If you don’t know how to install Forge, follow this tutorial.
After installing Forge, simply put the downloaded file in the folder of your Minecraft directory.
Note: The Replay Mod is entirely client side and can not be installed on the servers you play on.
1.2 Installing FFmpeg
To use the Replay Mod‘s Rendering Feature, you need to have FFmpeg installed.
1.2.1 Windows
Download the latest FFmpeg Static Build for your architecture from http://ffmpeg.zeranoe.com/builds/.
Then, extract the downloaded file in the folder you want to install FFmpeg in.
Next, download this Batch Script to quickly install FFmpeg: https://replaymod.com/files/ffmpeg-path-installer.bat
Note: If your browser warns you about the download, dismiss the message. It’s a simple Batch Script which won’t damage your computer.
Put the downloaded script into the folder where you extracted FFmpeg and run it by double-clicking it. If you see a success message in the console, you’ve successfully installed FFmpeg!
1.2.2 Mac OSX
On OSX, you can install FFmpeg with Homebrew using .
Alternatively, you can download the lastest static build from http://ffmpeg.org and copy the ffmpeg executable to .
3.1 Movement
3.1.1 Basic Controls
While in the Replay, you can freely move around using the movement keys (WASD, Space, Shift by default).
You can move through blocks similar to Spectator Mode.
Using the Mouse Wheel, you can modify your flying speed. Scrolling up causes you to fly faster, while scrolling down slows you down.
3.1.2 Camera Roll
While in a Replay, you can tilt the Camera.
By default, pressing J will tilt the screen clockwise,
and pressing L will tilt the screen counterclockwise.
Using K, you can reset the Camera Roll.
When holding the Ctrl key (Cmd key on Mac) while tilting, you can tilt slower and more precisely.
Note: Most of the Keybindings mentioned in this documentation can be changed in Minecraft’s Control Menu.
3.1.3 Spectating Entities
You can spectate any living entity (including players) while in a Replay. When looking at an entity, a crosshair will be visible.
By right-clicking, you will start spectating the entity. If you want to stop spectating the entity, use your Sneak Key (Shift)

A Screenshot taken with a tilted camera
4.1 Authentication
When starting Minecraft with the Replay Mod installed, you will be asked to login to ReplayMod.com.If you don’t want to use the Replay Center, you can click the «Skip» Button to continue without logging in.
If you want to browse other users’ Replays and share your own Replays however, you need to Register an account.
Note: By registering an Account on ReplayMod.com, you agree to the Website’s Terms of Service
Please note that you can only create one ReplayMod.com Account per Minecraft Account, so choose your username wisely.
Once you’ve registered, you’re automatically going to be logged in. The Mod remembers your login until you manually log out from the Replay Center, so it won’t ask you upon every startup if you logged in once.

The Login Screen which is displayed upon startup

The Register Screen
3.4 Custom Objects
3.4.1 Introduction
Custom Objects are mainly meant for video creators. They allow you to add any image into the Replay World and animate its Position, Opacity and much more.
Instead of using Motion Tracking to add text or pictures to a video, you can directly add these to the
rendered file.
3.4.2 Adding Assets
In order to create Custom Objects, you first have to add Assets to your Replay File.
Therefore, open the Asset Manager using the G key.
In the Asset Manager, you can add Image Files (.png, .jpg and more), so-called Assets, to the Replay.
When clicking the «Add» button, a File Chooser will show up. Select the image file you want to use.
You can give the Asset a custom name using the Text Input Field in the top right corner.
All of the Assets you added can be used by Custom Objects.

The Asset Manager with an example Asset
3.4.3 Creating Custom Objects
Using the F key, you can open the Object Manager. Initially, there won’t be any Objects in the Object List, but you can
simply add an Object using the «Add» button.
After doing so, you can name the newly created Custom Object using the Text Field in the upper right corner.
To define which Asset File (i.e. image) the Custom Object should use, select the desired Asset from the dropdown beneath the Name Input.
If you leave the Object Manager, you should see the image in the World somewhere near your position.

The Object Manager with some Animation Keyframes.
3.4.4 Animating Custom Objects
Of course, you don’t want the image to stay at that position. Therefore, open the Object Manager again and select the Custom Object you want to modify.
On the lower half of the screen, you will see multiple Input Fields, using which you can modify various settings (so-called Transformations), for example the Object’s
Position, Scale, Orientation and Opacity.
When editing these values, you’ll notice that on the Timeline to the right, Keyframes appear.
You can set and remove Keyframes for specific settings using its «Add Keyframe» button on the very left of the screen.
The Object Manager’s Keyframe System is very similar to the Position Keyframe and Time Keyframe System.
During a Camera Path, the Custom Objects will interpolate their Transformation Values like Position Keyframes are interpolated.
While outside the Object Manager, you can preview the Objects’ position by moving the cursor on the Keyframe Timeline — the Objects will
interpolate to the position they’ll be at that timestamp during the Camera Path.
Once you got the hang of it, you’ll be able to quickly animate Custom Objects.

An animated Custom Image Object.
Development
Branches
TL;DR:
Main development happens on the branch, snapshots are built from this branch.
The branch contains the most recent release.
The branch is solely to be used for the file that contains a list of all versions
used by the clients to check for updates of this mod.
The Preprocessor
To support multiple Minecraft versions with the ReplayMod, a JCP-inspired preprocessor is used:
        //#if MC>=11200
        // This is the block for MC >= 1.12.0
        category.addDetail(name, callable::call);
        //#else
        //$$ // This is the block for MC
        //$$ category.setDetail(name, callable::call);
        //#endif
Any comments starting with will automatically be introduced / removed based on the surrounding condition(s).
Normal comments are left untouched. The branch is optional.
Conditions can be nested arbitrarily but their indention shall always be equal to the indention of the code at the line.
The shall be aligned with the inner-most .
    //#if MC>=10904
    public CPacketResourcePackStatus makeStatusPacket(String hash, Action action) {
        //#if MC>=11002
        return new CPacketResourcePackStatus(action);
        //#else
        //$$ return new CPacketResourcePackStatus(hash, action);
        //#endif
    }
    //#else
    //$$ public C19PacketResourcePackStatus makeStatusPacket(String hash, Action action) {
    //$$     return new C19PacketResourcePackStatus(hash, action);
    //$$ }
    //#endif
Code for the more recent MC version shall be placed in the first branch of the if-else-construct.
Version-dependent import statements shall be placed separately from and after all other imports.
Common version dependent code (including the fml and forge event bus) are available as static methods/fields in the class.
The source code in is generally for the most recent Minecraft version and is automatically passed through the
preprocessor when any of the other versions are built (gradle projects , , etc.).
Do NOT edit any of the code in as it is automatically generated and will be overwritten without warning.
You can change the version of the code in if you wish to develop/debug with another version of Minecraft:
./gradle :1.9.4:setCoreVersion # switches all sources in src/main to 1.9.4
If you do so, you’ll also have to refresh the project in your IDE.
Make sure to switch back to the most recent branch before committing!
Care should also be taken that switching to a different branch and back doesn’t introduce any uncommitted changes (e.g. due to different indention, especially in case of nested conditions).
Some files may use the same preprocessor with different keywords.
If required, more file extensions and keywords can be added in the block of the script.
Versioning
- No , the ReplayMod does not provide any external API
- «Updating to a new Minecraft version» should not increment , we maintain one version of the ReplayMod
for each version of Minecraft and all these versions share the same feature set (and most bugs). We therefore try to
keep the version name the same for all of them (with the exception of of course). This also means that the
«Multiple Minecraft Version» section does not apply. - For pre-releases the shorter is used instead of
When a new version is (pre-)release, a new commit modifying the file should be added and the
file in the branch should be updated. To simplify this process the gradle task can
be used: . It will create the commit and update the version.json
accordingly.
Care should be taken that the updated is not pushed before a jar file is available on the
download page (or Jenkins) as it will inform the users of the update.
3.4 Custom Objects
Custom Objects are not available in the 2.0.0 versions. They are expected to return eventually.
3.4.1 Introduction
Custom Objects are mainly meant for video creators. They allow you to add any image into the Replay World and animate its Position, Opacity and much more.
Instead of using Motion Tracking to add text or pictures to a video, you can directly add these to the rendered file.
3.4.2 Adding Assets
In order to create Custom Objects, you first have to add Assets to your Replay File.Therefore, open the Asset Manager using the key.
In the Asset Manager, you can add Image Files (.png, .jpg and more), so-called Assets, to the Replay.When clicking the «Add» button, a File Chooser will show up. Select the image file you want to use.You can give the Asset a custom name using the Text Input Field in the top right corner.
All of the Assets you added can be used by Custom Objects.

The Asset Manager with an example Asset
3.4.3 Creating Custom Objects
Using the key, you can open the Object Manager. Initially there won’t be any Objects in the Object List, but you can simply add an Object using the «Add» button.
After doing so, you can name the newly created Custom Object using the Text Field in the upper right corner.To define which Asset File (i.e. image) the Custom Object should use, select the desired Asset from the dropdown beneath the Name Input.
If you leave the Object Manager, you should see the image in the World somwhere near your position.

The Object Manager with some Animation Keyframes
3.4.4 Animating Custom Objects
Of course, you don’t want the image to stay at that position.
herefore, open the Object Manager again and select the Custom Object you want to modify.On the lower half of the screen you will see mutliple Input Fields, using which you can modify various settings
(so-called Transformations), for example the Object’s Position, Scale, Orientation and Opacity.
When editing these values, you’ll notice that on the TImeline to the right, Keyframes appear.
You can set and remove Keyframes for specific settings using its «Add Keyframe» button on the very left of the screen.
The Object Manager’s Keyframe System is very similar to the Position Keyframe and Time Keyframe System.
During a Camera Path, the Custom Objects will interpolate their Transformation Values like Position Keyframes are interpolated.While outside the Object Manager you can preview the Objects’ position by moving the cursor on the Keyframe Timeline — the Objects will interpolate to the position they’ll be at that timestamp during the Camera Path.
Once you got the hang of it, you’ll be able to quickly animate Custom Objects.
An animated Custom Image Object.
Replay Center
The Replay Center is where you can share your Minecraft Moments with others and discover awesome Replays by other Users.
To be able to use the Replay Center, you need an account on ReplayMod.com.
4.1 Authentication
When starting Minecraft with the Replay Mod installed, you will be asked to login to ReplayMod.com.
If you don’t want to use the Replay Center, you can click the «Skip» Button to continue without logging in.
If you want to browse other users’ Replays and share your own Replays however, you need to Register an account.
Please note that you can only create only one ReplayMod.com Account per Minecraft Account, so choose your username wisely.
Once you’ve registered, you’re automatically going to be logged in. The Mod remembers your login until you manually log out from the Replay Center,
so it won’t ask you upon every startup if you logged in once.
4.2 Replay Files
Once you’ve logged in, you can use the «Replay Center» Button in the Main Menu to access the Replay Center.
In the upper half of the screen, there are 6 Buttons for 6 Tabs of the Replay Center:
- Recent
Shows the most recently uploaded Replays in the
Replay Center
Best
Shows the Replays with the best rating and most downloads
Downloaded
Shows all of the Replays you’ve downloaded locally
Favorited
Shows all of the Replays you favorited
Search
Allows you to search for specific Replays
When you’ve found an interesting looking Replay, you can download it using the «Download» Button in the lower left corner. After downloading,
you’ll automatically join the Replay.
After you’ve downloaded a Replay, you can rate and favorite it in the Replay Center using the respective buttons.You are encouraged to rate Replays after you downloaded them to help promoting the best Replays.

The Login Screen which is displayed upon startup

The Register Screen

The Replay Center in the Mod
Building
Make sure your sub-projects are up-to-date:
For compiling 1.7.10, you must run once after the initial clone. This may take quite some time.
No IDE
You can build the mod by running (or just ). You can then find the final jar files in .
You can also build single versions by running (or just ) (builds the MC 1.8 version).
IntelliJ
For the initial setup run .
You also need to enable the Mixin annotation processor:
- Go to File -> Settings -> Build, Execution, Deployment -> Compiler -> Annotation Processors
- Tick «Enable annotation processing»
- Add a new entry to the «Annotation Processor options»
- For Forge, set the name to «reobfSrgFile» and the value to «$path/versions/$MCVERSION/build/mcp-srg.srg» where you replace $path with the full
path to the folder containing the gradlew file - For Fabric, set the name to «inMapFileNamedIntermediary» and the value to «$HOME/.gradle/caches/fabric-loom/mappings/net.fabricmc.yarn-tiny-$YARNVERSION» where you replace $HOME with your home folder and $YARNVERSION with the respective yarn version used by the RM
1.2 Installing FFmpeg
To use the Replay Mod‘s , you need to have FFmpeg installed.
1.2.1 Windows
Download the latest FFmpeg Static Build for your architecture from http://ffmpeg.zeranoe.com/builds/.Then, extract the downloaded file in the folder you want to install FFmpeg in.
Next, download this Batch Script to quickly install FFmpeg: https://replaymod.com/files/ffmpeg-path-installer.bat
Note: If your browser warns you about the download, dismiss the message. It’s a simple Batch Script which won’t damage your computer.
Put the downloaded script into the folder where you extracted FFmpeg and run itt by double-clicking it.
If you see a success message in the console, you’ve sucessfully installed FFmpeg!
Alternatively, starting with ReplayMod 2.0.0-b5, you can also extract the downloaded file into a folder
(you have to create it, it doesn’t exist by default) in your folder. No need to run any Batch Script.
The FFmpeg executable should end up at .
1.2.2 Mac OSX
On OSX, you can install FFmpeg with Homebrew using .
Alternatively, you can download the latest static build from https://ffmpeg.org/ and copy the ffmpeg executable to .
1.2.3 Linux
On Linux, you can install FFmpeg using your system’s package manager, for example using .
If in doubt, consult the documentation of your distribution.
3.1 Movement
3.1.1 Basic Controls
While in the Replay, you can freely move around using the movement keys ( by default).
You can move through block similar to Spectator Mode.
Using the Mouse Wheel, you can modify your flying speed. Scrolling up causes you to fly faster, while scrolling down slows you down.
If you prefer the camera to be controlled similar to vanilla Creative Mode, you can change that in the Replay Settings.
3.1.2 Camera Roll
While in a Replay, you can tilt the Camera.
By default, pressing will tilt the screen clockwise, and pressing will tilt the screen counterclockwise.Using , you can reset the Camera Roll.
When holding the key ( key on Mac) while tilting, you can tilt slower and more precisely.
Hint: Most of the Keybindings mentioned in this documentation can be changed in Minecraft’s Control Menu.

A Screenshot taken with a tilted camera
3.1.3 Spectating Entities
You can spectate any living entitiy (including players) while in a Replay. When looking at an entity, a crosshair will be visible.
By right-clicking, you will start spectating the entity. If you want to stop spectating the entity, use your Sneak Key ().
Frequently Asked Questions
For how long can I record?
Theoretically, a Replay File can be up to 24 days, 20 hours, 30 minutes and 23 seconds long — which is a timespan you’ll probably never reach.
How many chunks around me does the Mod record?
If you’re playing in Singleplayer, all of the loaded chunks within your Render Distance are recorded.If you’re on a server, this depends on the view-distance setting in the server.properties file, which is set to 11 Chunks by default.
The Replay Mod of course records every loaded, not only the rendered chunks. Therefore, chunks behind your back are recorded as well.
Why can’t I start recording in the middle of a session?
Due to the way the Replay Mod works, you need to start recording when joining a Server or World — otherwise some data which the Replay Files need is missing.
How does recording affect my FPS?
Usually, recording a Replay does not affect your framerate, and it also doesn’t lead to lag on servers.We’ve tested the Mod on a low-end notebook with only 3GB of ram, and everything worked fine.
How big are the files the Replay Mod records?
The file size of the recorded .mcpr files greatly depends on the amount of world data the replay contains.A Replay in which you travelled around and discovered a lot of terrain is significantly larger than a Replay which was recorded in a void world.
An average Replay File of 10 Minutes duration usually is between 2MB and 10MB large.
Replays recorded on Minigame Servers with lots of particle effects and world changes might be larger.
4.2 Replay Files
Once you’ve logged in, you can use the «Replay Center» Button in the Main Menu to access the Replay Center.
In the upper half of the screen, there are 5 Buttons for 5 Tabs of the Replay Center:
- RecentShows the most recently uploaded Replays in the Replay Center
- BestShows the Replays with the best rating and most downloads
- DownloadedShows all of the Replays you’ve downloaded locally
- FavoritedShows all of the Replays you favorited
- SearchAllows you to search for specific Replays
When you’ve found an insteresting looking Replay, you can download it using the «Download» Button in the lower left corner.
After downloading, you’ll automatically join the Replay.
After you’ve downloaded a Replay, you can rate and favorite it in the Replay Center using the respective buttons.
You are encouraged to rate Replays after you downloaded them to help promoting the best Replays.

The Replay Center in the Mod
1.3 Compatibility with other Mods
1.3.2 Shaders Mod
Karyonix’ Shaders Mod
is no longer compatible with Minecraft Forge starting with 1.9.4. As such it is not compatible with the Replay Mod either.
Please use Optifine instead.
1.3.3 Custom Main Menu
The Custom Main Menu mod is often used in mod packs to customize their Main Menu with a button layout fitting the background image, links to their website / bug tracker and similar.
If you are familiar with it, the button ids for the Replay Mod are: 17890234 (text: ), 17890237 (text: ) and 17890236 (text: )
Due to the nature of this Custom Main Menu mod, buttons added to the Main Menu by 3rd party mods like the Replay Mod will not show up by default.Thus, to access the Replay Viewer/Editor/Center, you need to manually configure the position for those buttons.To do so, you need to modify the Custom Main Menu configuration file.
Usually, you can find it at (if you’re using a mod pack launcher, it normally has its own .minecraft folder).For an explanation of this config file, have a look at Custom Main Menu’s page.
You can find a list of already modified config files here.
3.7 Player Overview
Using the B key, you can open the Player Overview. In the Player Overview, you see a list of all currently loaded Players in the Replay.
By clicking on a player’s Name or Head, you can spectate this player.
Next to each player, there’s a checkbox using which you can toggle the player’s visibility. This way, you can hide certain players from the Replay.
Above the individual checkboxes, there are two checkbox buttons — one to hide all players and one to show all players.
If you want to save the player visibility settings, check the «Remember Hidden Players» checkbox.
If checked, invisible players will stay invisible after closing the Replay (this can of course be reverted), otherwise all of the players are visible again after reloading the Replay.
The Player Overview Screen
Frequently Asked Questions
For how long can I record?
Theoretically, a Replay File can be up to 24 days, 20 hours, 30 minutes and 23 seconds long — which is a timespan you’ll probably never reach.
How many chunks around me does the Mod record?
If you’re playing in Singleplayer, all of the loaded chunks within your Render Distance are recorded.
If you’re on a server, this depends on the view-distance setting in the server.properties file, which is set to 11 Chunks by default.
The Replay Mod of course records every loaded, not only the rendered chunks. Therefore, chunks behind your back are recorded as well.
Why can’t I start recording in the middle of a session?
Due to the way the Replay Mod works, you need to start recording when joining a Server or World — otherwise some data which the Replay Files need is missing.
How does recording affect my FPS?
Usually, recording a Replay does not affect your framerate, and it also doesn’t lead to lag on servers.
We’ve tested the Mod on a low-end notebook with only 3GB of ram, and everything worked fine.
How big are the files the Replay Mod records?
The file size of the recorded .mcpr files greatly depends on the amount of world data the replay contains.
A Replay in which you travelled around and discovered a lot of terrain is significantly larger than a Replay which was recorded in a void world.
An average Replay File of 10 Minutes duration usually is between 2MB and 10MB large. Replays recorded on Minigame Servers with lots of particle effects and world changes might be larger.
1.3 Compatibility with other Mods
1.3.1 General information
In General, the Replay Mod should be compatible with most Forge Mods. However, due to the way that recording works, many Mods that add new Blocks, Mobs or Game Mechanics are not supported.
Mods that simply modify the Client (like the PixelCam Mod or the
CommandGroups Mod) usually work.
1.3.2 Optifine
The Replay Mod is compatible with , which can be downloaded at http://optifine.net/downloads.
Other Optifine Versions for Minecraft 1.8.0 might, but don’t have to be compatible as well.
Warning: If you have Optifine installed, you can not render videos from within the Replay Mod.
This might change in future Replay Mod versions.
1.3.3 Shaders Mod
You can use the Replay Mod together with karyonix’ Shaders Mod,
but rendering videos results in possible crashes and malformed videos. Therefore, you have to uninstall the Shaders Mod before rendering.
3.2 Controlling Time
3.2.1 Replay Speed
In the upper left corner of your screen, there is a Play/Pause button (Shortcut: P), using which you can entirely pause the time of the Replay.
All Entities, Particles and Block Updates will be frozen until you resume. You can fly through a paused Replay as usual.
Next to the Play/Pause Button, there is a Speed Slider. Using the Speed Slider, you can control how fast the time in your Replay passes.
The minimum Speed value is 0.1 times the normal Minecraft Tick Speed, and the maximum Speed is 8 times as fast.
3.2.2 Jumping in Time
To the right of the Speed Slider, there is the Replay Timeline.
On the Replay Timeline, you see a yellow cursor indicating your current position in the Replay.
By clicking somewhere on this Timeline, you will travel in time towards the specified point in time.
Please note that it takes longer to do larger steps in time or to jump backwards in time.

The Play/Pause Button, Speed Slider and Replay Timeline highlighted